Setup Jenkins with PHP, Phing, Symfony & PHPUnit
Table of Contents
In this post, we will cover the installation, setup and basic usage of Jenkins.
If you’ve never heard of Jenkins before, Jenkins is a continuous integration tool which automates the building of your application, it can be set up to unit test your code, check for mess detection & coding standards as well as many other things after each commit or before a release build.
I’m a huge fan of unit testing, I love being able to automate the testing of your code as well as using tools like mess detection, phplint & phpcs to write cleaner, consistent testable code.
Introduction - What is Jenkins?
Jenkins allows you to automate the entire build process by allowing the user to provide a few key files which it can then use to build your app. Basically, you have a build.xml file which will be run by a “process driver” like apache ant or Phing. The build.xml file allows you to specify the running of command line applications in your suited order to create a workspace. So for example, a very simple build would:
- Checkout a copy of your project from your repository.
- Setup permissions for cache directories.
- Run QA tools such as phpunit or phpcs
- View the results in Jenkins (with an easy to use interface).
This allows you to create a new build, run all your tests and ensure everything is working as expected. You can even deploy a successful build, or deploy when a branch has been merged with a little work (this is known as continuous delivery).
I’m using Mac OSX 10.9 Mavericks, the installation instructions will be similar for all operating systems. Once installed, the usage of Jenkins should be the same.
You must be using some form of source control, GIT, SVN, whatever. I’ll be using GIT (through unfuddle) in this tutorial. I assume you already have a project setup and under version control (I’ll use a Symfony demo application within the examples here).
Installing the required tools
You can install all the tools we discuss here with Composer, Phar archives or PEAR.
I’ve written a separate post on how to do all three here:
Installing Jenkins
Section Contents
First we have to install Jenkins, head over to Jenkins-ci.org and download and install the latest release for your operating system, at the time of writing I used Jenkins-1.566.pkg on Mac OS X 10.9.
- Mac OS X:
- http://mirrors.Jenkins-ci.org/osx/latest
- Windows:
- http://mirrors.Jenkins-ci.org/windows/latest
- Other:
- http://mirrors.Jenkins-ci.org
Installation on Windows or Mac
Install the package like any other, once installed, you will have:
- A new Jenkins user
- A new Applications directory Jenkins with a .war file (Web Application Archive).
Installing Jenkins on AWS EC2
You can install Jenkins on an Amazon EC2 instance using the following commands; remember that if you use Composer and Jenkins, you will need to use a small instance as minimum (a micro instance has insufficient memory), a small instance will also be a lot faster!
Next lets update the repository, wget the Jenkins repository, --import it into your package manager and install Jenkins.
yum update
wget -O /etc/yum.repos.d/Jenkins.repo http://pkg.Jenkins-ci.org/redhat-stable/Jenkins.repo
rpm --import http://pkg.Jenkins-ci.org/redhat-stable/Jenkins-ci.org.key
yum install Jenkins
Start the Jenkins service manually, and have it start up automatically on boot.
service Jenkins start
chkconfig Jenkins on
Check Jenkins installed correctly
If Jenkins was installed correctly, you should see the web browser interface by surfing to http://localhost:8080.
You should see a screen like this:

Securing a Jenkins Install
So we’ve installed Jenkins, but as you’ve noticed above, it’s publicly accessible through the internet to anyone. Next we’ll configure some security measures to prevent unauthorized access.
Get to your security settings, Manage Jenkins > Configure Global Security
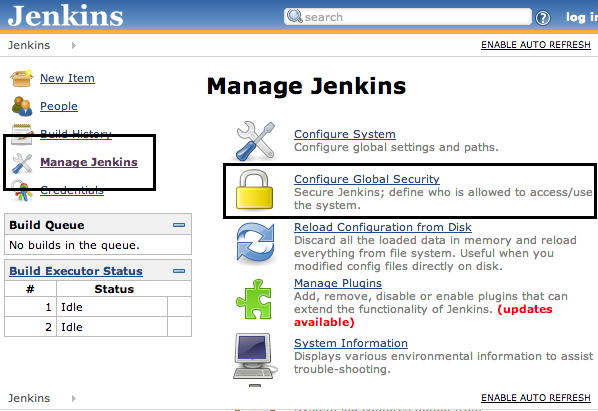
Do the following:
- Check the Enable Security checkbox. (Jenkins provides multiple security methods like LDAP or Unix user/group database, we will use the Jenkins' Own User Database).
- Check the Jenkins' Own User Database Radio button - under the Security Realm heading.
- Check the Allow users to sign up checkbox under the Jenkins' own user database
- Under Authorization select Matrix-based security.
- In the User/group to add: text box, add a user administrator, give them ALL permissions.
- Click the Save button
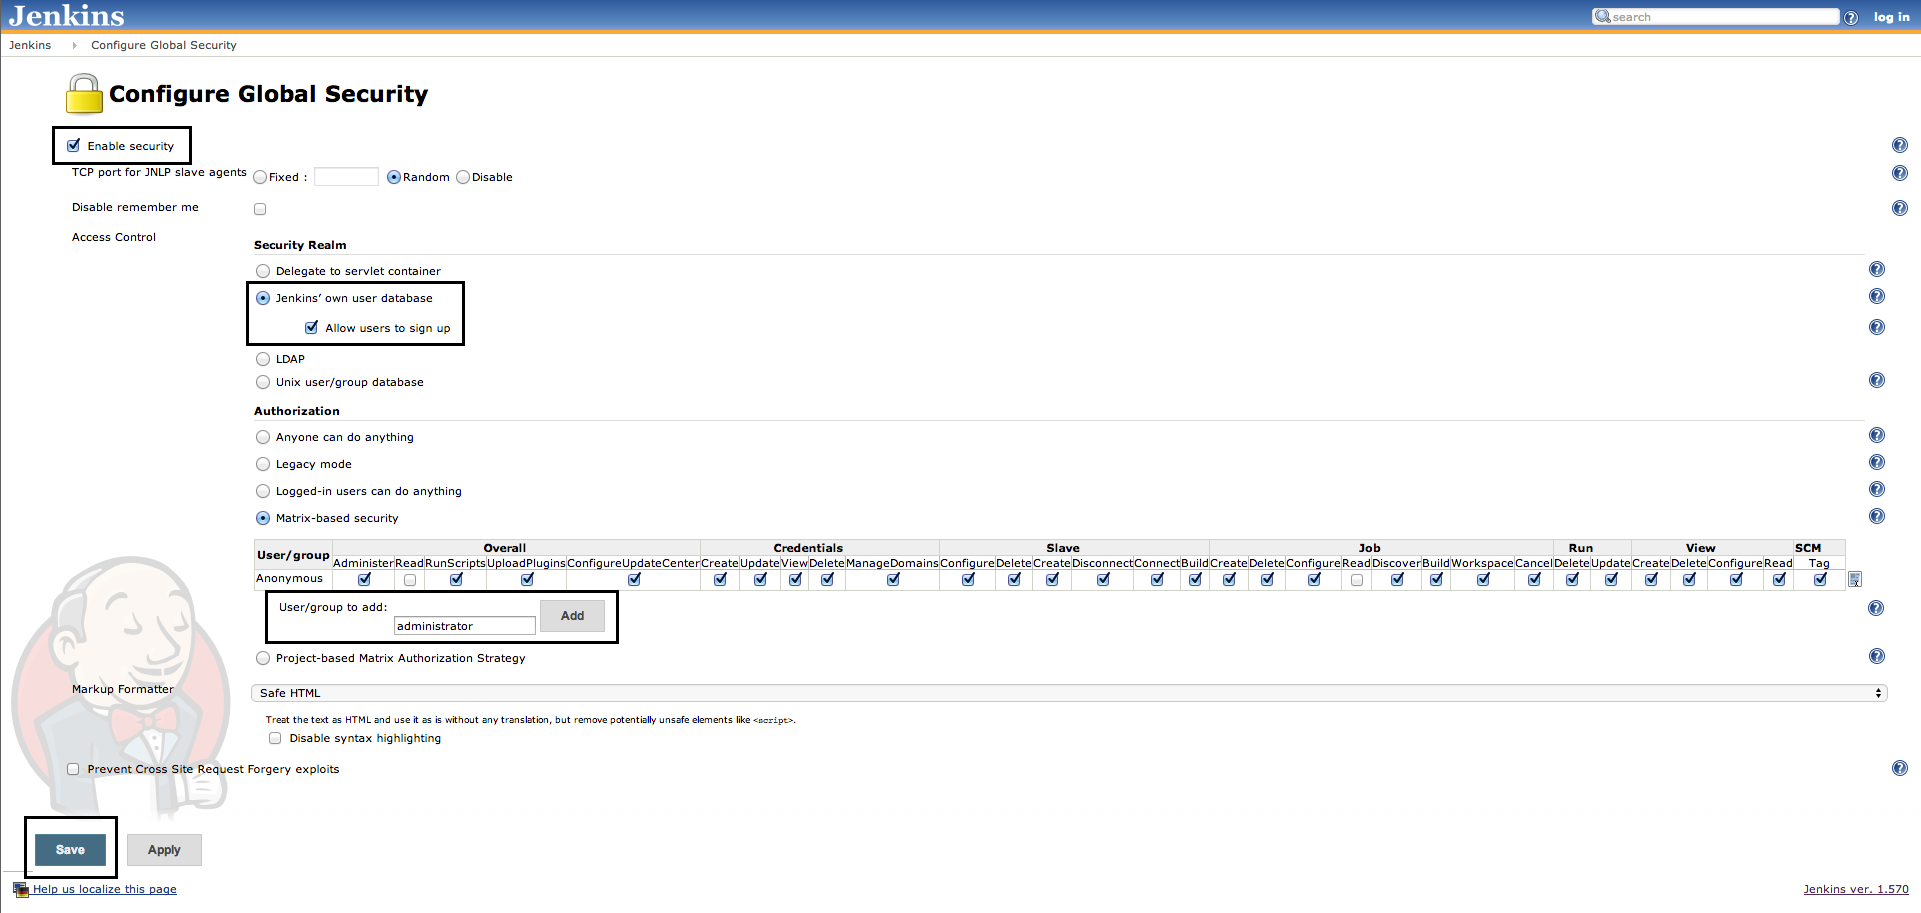
After the save, you will be redirected to the login form, under the login form you will see a Create an account link, follow that link and create a new account with the username administrator (as in the setup above), you will be logged in straight away!
Congrats! - You have secured your Jenkins Installation!
Starting and stopping Jenkins from the terminal
You can start and stop Jenkins using the commands below (Use the ones relevant to your OS).
# Start & Stop Jenkins - Mac OSx
sudo launchctl load /Library/LaunchDaemons/org.Jenkins-ci.plist
sudo launchctl unload /Library/LaunchDaemons/org.Jenkins-ci.plist

# Start & Stop Jenkins - Windows
Jenkins.exe start
Jenkins.exe stop
Jenkins.exe restart

# Amazon EC2
service Jenkins start
service Jenkins stop
service Jenkins restart
Kill Jenkins from the terminal
If Jenkins ever plays up, you can find the process id using ps -e | grep Jenkins and kill the bastard using sudo kill {process_id}.
ps -e | grep Jenkins
# Returns:
# 101 ??         1:29.48 /usr/bin/java -Dfile.... blah blah ..
#  ^  We're interested in this `process id`
sudo kill 101
Adding a custom virtual host to serve Jenkins
You should only ever need one Jenkins CI server per server, you can host multiple projects using the same Jenkins instance.
You can setup a virtual host to make Jenkins easier to access, this is what I used for my apache 2.2 server.
<VirtualHost *:80>
    ServerName Jenkins
    ProxyPreserveHost on
    ProxyPass /  http://localhost:8080/ nocanon
    ProxyPassReverse  /  http://localhost:8080/
    ProxyRequests     Off
    AllowEncodedSlashes NoDecode
    <Proxy *>
        Order deny,allow
        Allow from all
    </Proxy>
</VirtualHost>
How to setup Jenkins for PHP
If you’ve made it this far, your home straight. We need to go through the following steps to setup Jenkins.
Install Jenkins PHP plugins
In the previous sections we setup all the tools we are going to use, now we need to install a few plugins in Jenkins so we can configure and use them.
wget http://localhost:8080/jnlpJars/Jenkins-cli.jar
java -jar Jenkins-cli.jar -s http://localhost:8080 install-plugin checkstyle cloverphp dry htmlpublisher jdepend plot pmd violations xunit

java -jar Jenkins-cli.jar -s http://localhost:8080 install-plugin Phing ruby Phing RVM php rake
java -jar Jenkins-cli.jar -s http://localhost:8080 safe-restart
Setup Environment PATH within Jenkins
We need to tell Jenkins the PATH of all our tools, so it knows where to look when it tries to run them (just like our OS).
- In the top left menu, Click Jenkins > Manage Jenkins > Configure System.
- Under Global Properties check the Environment Variables checkbox
- Add the property with the name PATH
- Add the value: $PATH:/usr/local/php5/bin:/usr/local/bin/:/path/to/.composer/vendor/bin/ Update the paths above to reflect your environment. Now Jenkins has access to all our tools available in our PATH.
- It should look something like this:
So we’ve added 3 paths to our Jenkins environment, our PHP path, our local libs and the composer bin directory. Now Jenkins can use these tools when we call them.
Setup our repository
Create a new project in Jenkins
Now we are ready to begin setting up our project. You can have as many projects as you want, each with different repository settings and build configurations. In this example, we will create a new project called Acme (the default demo bundle that ships with Symfony.
- Go back to home, and click the New Item link in the left navigation menu.
- Enter an Item name for your project.
- Select the radio button Build a free-style software project.
- Click OK
This will create a new project with your name and redirect you to the configure section. You can go back to home to see your new project.
Configure our newly created Jenkins project
Now we have our new project, we can setup our repository information. When we build a new project in Jenkins the very first thing it will do is pull the latest code from your source repository. So we need to setup Jenkins with all the configuration to access your repository (URL, credentials/SSH). You can set credentials on a domain basis or globally, in this example we are going to be adding them globally.
Creating Credentials
- From Jenkins Home, click Credentials (left nav menu)
- Click the Global credentials link within the credentials table
- Click Add Credential (left nav menu)
- Enter all the required info, you can change the type in the kind select box.
- Click OK to add your credentials.
Setting up the repository
Now we have our credentials set, we can setup our repository (for this project).
- From Jenkins Home, click on your project name to take you into the project
- Click on Configure (left nav menu)
- Under Source Code Management, Select your version control system (e.g: GIT)
- Enter your repository URL: e.g: https://host.unfuddle.com/git/username_repository/
- Select the credentials you created from the select box.
- Click Save (fixed at the bottom!)
Go back to Home, click on your project name in the left navigation menu, click Build Now. Jenkins will create a new build (notice it pop up in the build history via AJAX on click). If everything went OK, you will see a green light next to the build information. Click on the build date to get more information. We’re looking for the Console Output in the left navigation menu, click on it to view everything that happened. You should see Jenkins build your application. It will initialize and clone your repository into a new workspace,
I know your probably thinking, OK so what’s the big deal, I spent the last 30 minutes teaching an application how to checkout my repository, I could’ve done that myself. You could have built this application yourself, but instead we had Jenkins do it for us, now we have this application we can run Post Build commands to do all the other cool stuff we talked about earlier. This may sound difficult, but trust me, it’s incredibly easy!, as you’ll see in the next chapter.
How to setup post build actions in Jenkins
We need to setup Post Build actions for all our tools, this is very easy, we’ve already installed our tools & plugins for Jenkins. Once the build is complete, Jenkins will look for the information in the following directories so it can display all the results in a easy to use interface.
Under Configure in your project settings you will see a Add post-build action button under Post-build Actions
You can add each tool here, we have to specify a few arguments as required, mainly the location of the outputted data.
Add a new post-build action with the following options.
- class dl-horizontal()
- Publish PMD analysis results
- PMD Results = app/build/logs/pmd.xml
- Publish duplicate code analysis results
- Duplicate code results = app/build/logs/pmd-cpd.xml
- High priority threshold (default) = 50
- Low priority threshold (default) = 25
- Publish JUnit test result report
- Test report XMLs = app/build/logs/junit.xml
- Publish Clover PHP Coverage Report
- Clover XML Location = app/build/logs/clover.xml
- Report JDepend
- Pre-generated JDepend File = app/build/logs/jdepend.xml
- Publish Javadoc
- Javadoc directory = app/build/docs/
- Publish HTML reports
- Order: HTML directory to archive, Index page[s], Report title, Allow missing report=unchecked
- Row 1: app/build/code-browser, index.html, Code Browser
- Row 2: app/build/coverage, index.html, Code Coverage
Click Save!, Now we have the setup, we have one final thing to do, that is Phing. We’ll move onto this in the next chapter.
How to setup Phing to run post build actions in Jenkins
Finally we have to setup Phing to build our application, run all the tools and tests & save the output to the app/build/logs/*.xml.
To install Phing with Jenkins, you can have Jenkins download and setup the version for you.
Under /configure check install automatically and and the download URL http://www.phing.info/get/phing-2.7.0.zip, click save.
The first thing you need to do is create a build.xml file at the root of your project, commit it into your repository, Jenkins will look for it when it checks out your repository.
Next we need to add a build step.
- Go into your project (in Jenkins), click Configure (left navigation menu)
- Find the Build section with a button Add build step
- Add Invoke Phing Targets, (leave the targets blank)
- Click Save
Troubleshooting
When using Jenkins 1.544 from the command line, I got the following error (for the 1.544 version of Jenkins only).
hudson.security.AccessDeniedException2: anonymous is missing the Overall/Read permission
The solution was to use the following command to login, and then perform your task as usual.
# Login command
java -jar jenkins-cli.jar -s http://localhost:8080 login --username "$JCLIUSER" --password "$JCLIPASSWD"

# Run your command as usual
java -jar jenkins-cli.jar -s http://localhost:8080 safe-shutdown --username "$JCLIUSER" --password "$JCLIPASSWD"
This bug is fixed with the latest version of Jenkins, I had this issue on 1.544, consider upgrading your Jenkins version if you’re experiencing the same issue.
- Official ticket
- https://issues.jenkins-ci.org/browse/JENKINS-21086