Use AWS SES to receive emails with lambda and S3
Table of Contents
I’ve recently switched to using a static blog generator for my blog. I have the domain name anil.io, I wanted all the emails received to any addresses under this domain to be forwarded to another email address.
I wanted to host this blog on AWS S3 as a static web site with HTTPS and turbocharge it through amazon’s CloudFront CDN. I needed to use AWS Certificate Manager to verify my domain by sending a verification email and then proceed to link to certificate to CloudFront.
In September 2015, Amazon announced support for accepting inbound email to an S3 Bucket, lambda function or to publish notifications via amazon’s simple notification service.
The entire process is relatively simple to setup:
- Create an S3 Bucket as a static website. (must be the same name as your domain)
- Verify your email & domain with SES.
- Create a Lambda function to forward the email saved from SES.
Note
- This works with attachments.
- I’ll assume you already have an S3 Bucket enabled for static website hosting.
The flow
- Email SES
- User sends an email to email@domain.com
- SES S3
- SES saves it to a designated S3 bucket
- SES Lambda
SES notifies Lambda.
Lambda reads the email from S3 and forward’s it on to the target recipient.
- Lambda User
- User receives email
Setting up an AWS lambda function for SES
We need to create a new AWS Lambda function which will forward our email on to the user, this will be invoked by SES with the rule sets we apply later.
→ Open the AWS Lambda Console.
→ Click the Create a Lambda function button.
→ On the Select blueprint screen, at the bottom, click Skip. (we don’t want to use a blueprint, we’ll define our own).
→ Under the Configure function screen, enter the following options:
- Function Name
- S3LambdaSESForwarder
- Description
- Forwards our mail on to us when received by SES.
- Runtime
- Node.js 4.3
- Edit Code Inline (copy & paste this script)
- Handler
- index.handler
- Role
Basic Execution Role (this will open a new popup to the IAM console)
Enter a name: LambdaS3SesForwarder
Use the following policy. Remember to update your S3 Bucket name.
 1
 2
 3
 4
 5
 6
 7
 8
 9
10
11
12
13
14
15
16
17
18
19
20
21
22
23
24
25
26
27
{
    "Version": "2016-03-04",
    "Statement": [
       {
          "Effect": "Allow",
          "Action": [
             "logs:CreateLogGroup",
             "logs:CreateLogStream",
             "logs:PutLogEvents"
          ],
          "Resource": "arn:aws:logs:*:*:*"
       },
       {
          "Effect": "Allow",
          "Action": "ses:SendRawEmail",
          "Resource": "*"
       },
       {
          "Effect": "Allow",
          "Action": [
             "s3:GetObject",
             "s3:PutObject"
          ],
          "Resource": "arn:aws:s3:::YOUR-S3-BUCKET-NAME/*"
       }
    ]
}
- Memory
- 128mb
- Timeout
- 5 seconds (works for me, you may need to extend it if you’re having issues)
For the Lambda function code, you can use any method you prefer, we’ll use the edit code inline option.
Next, we need to verify our domain and email addresses in SES and create a ruleset.
Setting up amazon SES
We need to verify our domain name with SES to confirm we are the owners and prevent others using it.
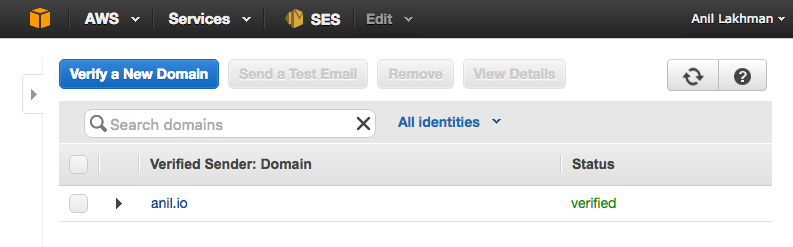
Verifying a domain name
This is straight forward, just follow the instructions as provided by the AWS console. You’ll prove you own the domain by adding a TXT entry and some CNAME entries to your DNS for this domain. AWS will then check you’ve done this (which proves you own the domain) and flag it as verified.
- Open the SES console.
- In the left menu, under Identity Management, click Domains.
- Click Verify a New Domain and continue with the instructions.
- Configure the DNS MX records to point to the SES endpoint provided (If you haven’t already, you should be prompted to do this).
- Verify an Email Address (left menu).
Once complete, you should see something similar to this.
Create a ruleset
We need to create a ruleset to match a certain email.
We’ll configure it to match all types.
In the left menu (within the SES console), click Rule Sets under the Email Receiving header.
You be prompted to enter a name. I’ll use anil-io-forward-all-email.
Click on the newly created ruleset.
Click Create Rule.
On the Recipients page, add the email addresses which you want to forward email from, leave it empty to forward all email (we’ll do this).
Click Next.
On the Actions page.
- Add an S3 action (add an optional object key prefix, I’m using folder/email)
- Add a Lambda action, Choose the function we created earlier S3LambdaSESForwarder.
It should look something like this:
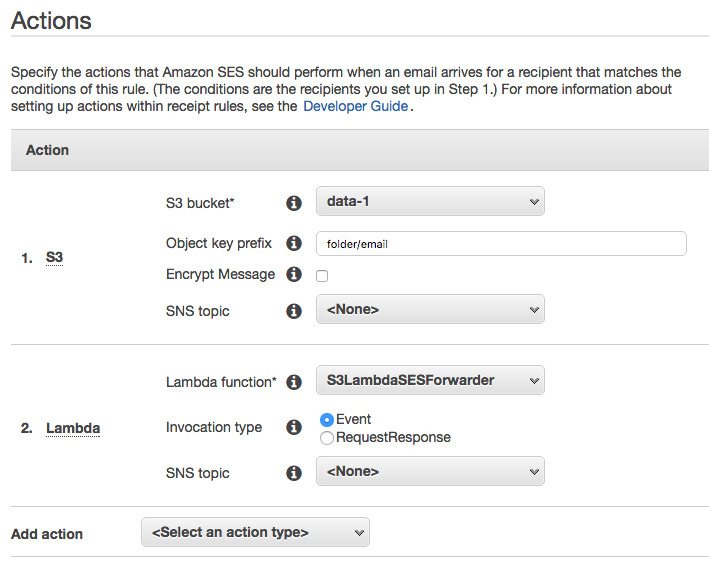
Note
They must be done in this order.
→ The email will first be saved to S3
→ Then the Lambda function will be invoked which will read the email from S3 and forward it to it’s final target.
Click Next and follow on with the rest of the steps.
- Name the rule
- Enable it
- Enable spam and virus scanning
Setup an S3 bucket policy
Finally, we need to setup an S3 Bucket policy. When you add the S3 action in SES, SES may add a bucket policy for root access only. This will cause issues when your Lambda script invokes as it won’t be able to read from S3.
We’ll update our bucket policy like so:
- Open your IAM console.
- Click Policies.
- Click Create Your Own Policy
- Enter a name GiveSESPermissionToWriteEmail. (and optional description)
- Enter the following policy document. (updating the highlight values)
Update the Bucket Name and AWS Account ID (you can get this from your Account Settings , it should be in this format: 1234-5678-9012 ).
1 2 3 4 5 6 7 8 9 10 11 12 13 14 15 16 17 18 19 | {
"Version": "2016-03-04",
"Statement": [
{
"Sid": "GiveSESPermissionToWriteEmail",
"Effect": "Allow",
"Principal": {
"Service": "ses.amazonaws.com"
},
"Action": "s3:PutObject",
"Resource": "arn:aws:s3:::S3-BUCKET-NAME/*",
"Condition": {
"StringEquals": {
"aws:Referer": "AWSACID-1234-5678-9012"
}
}
}
]
}
|
Click Validate Policy.
Click Save.
Go back to the IAM console, Click Policies in the left menu.
Find our newly added policy GiveSESPermissionToWriteEmail. Click it.
Click Attached Entities, click Attach.
Add our lambda_ses_forwarder role. (created when we setup our Lambda function)
Take it for a test drive!
We should be good to go. Send an email to your domain and you should see it forward to your selected email.
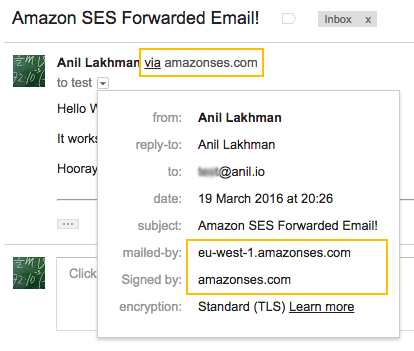
Amazon and Gmail lived happily ever after.
The End. 😊